Miele G 2874 SCVi Operations Instructions
Browse online or download Operations Instructions for Dishwashers Miele G 2874 SCVi. Miele G 2874 SCVi User Manual
- Page / 88
- Table of contents
- BOOKMARKS
- Operating instructions 1
- Contents 2
- Guide to the appliance 5
- Correct application 8
- Safety with children 8
- Technical safety 9
- Installation 11
- Correct use 11
- Accessories 12
- Disposal of your old 12
- Caring for the environment 13
- To open the door 15
- To close the door 15
- Insufficient salt 17
- +/- and confrim with OK 17
- External water softening 18
- Filling the salt reservoir 18
- Insufficient salt indication 20
- Rinse aid 21
- Adding rinse aid 21
- Rinse aid indicator 22
- Loading the dishwasher 23
- Operation 33
- Additional functions 41
- Cleaning and care 43
- Problem solving guide 48
- Maintenance 58
- After sales service 60
- Comparison tests 61
- Programme chart 64
- Optional accessories 70
- Electrical connection 71
- Plumbing 72
- ! The inlet hose must not be 73
- Technical data 75
- Settings menu ! 76
- Alteration rights reserved/ 88
- G2874 / 1409 88
- M.-Nr. 07 600 690 / 00 88
Summary of Contents
Operating instructionsfor dishwashersTo avoid the risk of accidents ordamage to the appliance, it isessential to read these instructionsas well as the
~This equipment may only beinstalled in mobile installations such asships if a risk assessment of theinstallation has been carried out by asuitably qu
Installation~The dishwasher must be installedand connected in compliance with theinstallation instructions.~The dishwasher must be correctlyaligned to
~Inadvertently filling the salt reservoirwith powder or liquid dishwasherdetergent will damage the watersoftener. Make sure you have boughtthe correct
Disposal of the packingmaterialThe packing material protects the dryerfrom transport damages. The transportand protective packing has beenselected fro
Energy saving washingThis dishwasher is exceptionallyeconomical in its use of water andelectricity.You can make the most of yourappliance by following
To open the doorAt the end of the programme, the doorwill open automatically a little in order tohelp the drying process.This function can be deactiva
Welcome screen^Switch the dishwasher on with the On button U.If the dishwasher is being switched on for the first time, thewelcome screen will appear.
Setting the time of dayThe display will then change to the screen for setting thetime.} +12:00} -Please set the time OK }^Set the hours with+/- and co
Before using the appliance forthe first time, you require:–Approx. 1 kg dishwasher salt,–Domestic dishwasher detergent,–Rinse aid formulated for domes
You can check the water hardness levelmeasured by the water softener sensorin the display (see Settings menu!,Water hardness).If the water hardness in
Guide to the appliance . . . . . . . . . . . . . . . . . . . . . . . . . . . . . . . . . . . . . . . . . . . . . 5Appliance overview ...
Do not fill the reservoir with water.^ Add salt only until the reservoir is fullor until water runs out of the opening.The salt reservoir holds approx
Rinse aidRinse aid is necessary to ensure waterdoes not cling and leave marks oncrockery during the drying phase andhelps crockery dry faster after it
^Add rinse aid only until it is visible inthe opening.The rinse aid reservoir holds approx.110 ml.^ Close the flap firmly so that it clicksinto place.
NoteRemove coarse food residues fromcrockery.There is no need to rinse items underrunning water.,Do not wash items soiled withash, sand, wax, lubricat
Items not suitable fordishwashers:–Wooden cutlery and crockery oritems with wooden parts: these maydiscolour and fade. The glue used inthese items is
Upper basket,For safety reasons, do notoperate the dishwasher without theupper and lower baskets in place(except when using theTall items 65 °C progra
Hinged cup rack^To make room for tall items, raise therack upwards.G 2XXX models:You can set the cup rack at twodifferent heights.^ Pull the cup rack
Support railThis support is designed to hold tallglasses and glasses with stemssecurely.^ Lower the support and lean tallglasses against it.^ You can
Adjusting the upper basketIn order to gain more space for tallerpieces of crockery in the bottom orupper basket, the upper basket can beadjusted on th
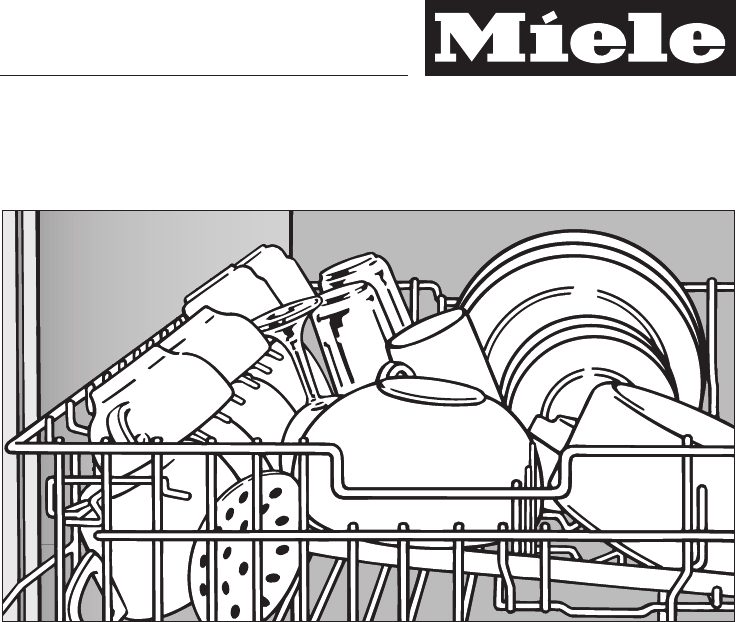
Lower basket^ For larger and heavier items such asplates, serving platters, saucepans,bowls, etc.Small items such as saucers can alsobe placed in the
Operation . . . . . . . . . . . . . . . . . . . . . . . . . . . . . . . . . . . . . . . . . . . . . . . . . . . . . . . 33Detergent ...
Narrow vario insertYou can remove the narrow vario insertto make more room for larger items ofcrockery, e.g. a large, flat pot, oranother type of inse
CutleryCutlery tray (depending on model)^ Arrange the cutlery in the tray asshown.To make unloading much easier,cutlery should be grouped in zones,one
Cutlery basket (depending on model)^ To avoid the risk of injury, knives andforks should be placed with thehandles upwards in the basket.However, cutl
Detergent,Only use detergents formulatedfor domestic dishwashers. Do notuse washing-up liquid.Miele branded dishwasher cleaningproducts are available
Dispensing^Follow the dosage recommended bythe manufacturer on the packaging.^Unless directed otherwise, use onedetergent tab or add 20 to 30 ml incom
Adding detergent^ Press the opening catch on thedetergent dispenser. The flap willspring open.The flap is always open at the end of aprogramme.^Add th
Switching on^Open the tap, if it is closed.^Open the door.^Make sure the spray arms are not obstructed.^Switch the dishwasher on using the U button.Th
You can now specify the type ofdishwasher detergent you use. Youcan choose normal detergent,2 in 1 tabs or Combi tabs (seeSettings menu!, Detergent ty
Start the programme^Select theStart option.The messagePlease close the doorwill appear.If you want to select a differentprogramme or make other change
Programme finishedAt the end of a programme the inoperation indicator light flashes on andoff slowly. It is visible even with the doorclosed.It will s
Comparison tests. . . . . . . . . . . . . . . . . . . . . . . . . . . . . . . . . . . . . . . . . . . . . . . . . 61Programme chart . . . . . . . . .
Changing a programmeIf the detergent dispenser flap has already opened, do notchange the programme.If a programme has already started and you wish to
Delay startThe start time of a programme can be delayed, e.g. to benefitfrom economy rates of electricity. A delay start time ofbetween 15 minutes and
^Confirm the start time withOK.The display will change to show the programme menu.^SelectStart.^Close the door.When the set time is reached, the progr
Check the condition of yourdishwasher regularly (approx. every4 - 6 months). This way faults andproblems can be avoided.,The outer surfaces of thedish
Cleaning the control panel anddoor front,Remove any soiling immediately.If not, it might become impossible toremove and could cause the outersurface t
Checking the filters in thewash cabinetThe filter combination in the base of thewash cabinet retains coarse soil fromthe suds solution, preventing ita
To clean the inside of the filter, the flapmust be opened:^ Press catches a together in thedirection of the arrows as shown, andopen the filter b.^ Ri
Cleaning the spray armsParticles of food can get stuck in thespray arm jets and bearings. The sprayarms should therefore be inspectedand cleaned regul
With the aid of the following guide, minor problems can be easily correctedwithout calling in a Miele service technician, saving you both time and mon
Problem Possible cause RemedyThe In-operationindicator is flashingquickly.The buzzer is sounding.One of the followingmessages appears inthe display:Te
Appliance overviewa Upper spray arm (not visible)b Cutlery tray (depending on model)c Upper basketd Middle spray arme Air inlet for drying(depending o
The dishwasher does not fill/drainProblem Possible cause RemedyThe In-operationindicator is flashingquickly.The buzzer is sounding.One of the followin
Problem Possible cause RemedyThe In-operationindicator is flashingquickly. In the"Without heater"programme thefollowing messageappears:Water
General problemsProblem Possible cause RemedyThe display is dark. The display hasswitched offautomatically to saveenergy (Standby mode).Press any butt
Problem Possible cause RemedyDetergent residue isleft in the dispenser atthe end of aprogramme.The dispenser was stilldamp when detergent wasadded.Mak
NoisesProblem Possible cause RemedyKnocking noise in thewash cabinet.A spray arm is knockingagainst an item in abasket.Interrupt the programme,and rea
Unsatisfactory washing resultProblem Possible cause RemedyThe dishes are notclean.The dishes were not loadedcorrectly.See notes in "Loading thedi
Problem Possible cause RemedyDishes, cutlery andglasses are not dryor are flecked.The amount of rinse aidmay be insufficient, or therinse aid reservoi
Problem Possible cause RemedyGlassware has abrown or blue tinge,and film cannot bewiped off.This may be caused by thedetergent.Change your detergent.G
Cleaning the water inlet filterA filter is incorporated in the screwconnection of the valve on the waterinlet hose. The filter must be cleanedwhen dir
Cleaning the drain pump andnon-return valveIf the water has not been pumped awayat the end of a programme the drainpump or the non-return valve might
Control panela Selector buttonsFor selecting the option displayednext to them.For altering the values displayed(+/-).For moving to other menus.b Displ
RepairsIn the event of any faults that youcannot remedy yourself, pleasecontact:–Your Miele Chartered Agent, or–the Miele Customer Contact CentreYou f
Test standard: AS/NZS 2007.1:2005, AS/NZS 2007.2:2005;AS/NZS 6400:2005Standard programme forenergy label comparison tests: NormalCapacity: 12/14 place
Model types G 1xxx with a cutlery tray (12 place settings):Upper basketCutlery trayLower basketComparison tests62
Model types G 2xxx with a cutlery tray (14 place settings):Upper basketCutlery trayLower basketComparison tests63
Crockery type Soiling Programmemixed,non-sensitive crockerynormal soilingvariable,sensor controlled washshortened cycleglasses and plasticcontainers,
Programme DetergentCompartment I2)Compartment II2)Sensor wash–25 mlor1 Tab+ TurboQuick wash 40°C–20 mlor1 Tab3)Sensor wash gentle #–20 mlor1 TabLight
Programme Programme sequencePre-wash Main wash°CInterim rinse Final rinse°CDrying12Sensor wash Variable programme sequence,sensor controlled adjustmen
Consumption1)Duration1)Energy WaterCold water20 °CkWhHot water60 °CkWhLitres Cold water20 °Ch:minHot water60 °Ch:min0,95-1,35 0,70-1,00 8-17 1:30-2:38
Programme When to useHygiene Programme with special parameters for hygienic removal of bacteria frombaby bottles, chopping boards, utensils etc.Pre-wa
Programme sequence Consumption1)Duration1)Energy WaterPre-washMainwash°CInterimrinse12Finalrinse°CDrying Coldwater20 °CkWhHotwater60 °CkWhLitres Coldw
DisplayThe display is used to select thefollowing:–the programme–extras–the delay start time–the Settings menu!–informationDuring a programme, the dis
To make the most of your dishwasherOptional accessories for particular purposes are available from your MieleChartered Agent or from the Spare Parts D
,Please follow the installationinstructions carefully.All electrical work should be carriedout only by a suitably qualified andcompetent person, in st
The Miele waterproof anti-leaksystemProviding your dishwasher has beeninstalled correctly, the Miele waterproofanti-leak system will protect you fromw
! The inlet hose must not beshortened or damaged in any wayas it contains electrical components(see illustration).This appliance incorporates back-flo
Drainage–The appliance drainage system isfitted with a non-return valve, whichprevents dirty water from flowingback into the dishwasher via thedrain h
Dishwasher model G 1XXX G 2XXXHeight 80.5 cm(adjustable + 6.5 cm)84.5 cm(adjustable + 6.5 cm)Height of building-inrecessMin. 80.5 cm (+ 6.5 cm) Min. 8
Settings menu ! for changing standard settingsTo open the Settings! menu^Switch the dishwasher on with the On button U,ifitisswitched off.The programm
Language JThe display can be set to appear in oneof several different languages.You can change the language for thedisplay via the "Language!&quo
Detergent typeTo ensure excellent results you canprogramme your dishwasher for thetype of detergent you are using.You can choose normal detergent,2 in
Drying plusAt the end of a programme with adrying phase (see "Programme chart"),the door will open automatically a littlein order to help th
This appliance conforms to currentsafety requirements. Inappropriateuse can, however, lead to personalinjury and damage to property.To avoid the risk
External water softeningsystemIf your dishwasher is connected to anexternal water softening system whichuses salt to reactivate, to achieve goodcleani
Change main menuYou can change the order of the programmes in the mainmenu and also enter your favourite programmes into the firsttwo programme places
Save extrasYou can set additional functions, e.g.Pre-wash, for individual programmes(see "Operation, Selecting Extraoptions").You can use th
BuzzerWhen the buzzer is activated, anaudible tone sounds at the end of aprogramme and when there is a fault.The buzzer is activated as standard atthe
Keypad tonesAn audible tone sounds each time abutton is pressed.There are seventeen different volumesettings.The factory default setting is 8.^Select
Showroom programmeThe programme is for display useonly.The dishwasher is fitted with variousdemonstration programmes forshowroom use.The Demo mode and
86
87
Alteration rights reserved/G2874 / 1409M.-Nr. 07 600 690 / 00
Technical safety~Before setting up the appliance,check it for any externally visibledamage. Under no circumstancesshould you use a damaged appliance.A
Related products and manuals for Dishwashers Miele G 2874 SCVi
 (76 pages)
 (24 pages)
© 2020, manymanuals.com. All rights reserved. | 1.203 s |
 Manymanuals.com
 Manymanuals.de
 Manymanuals.fr
 Manymanuals.it
 Manymanuals.pl
 Manymanuals.cz
 Manymanuals.es
 Manymanuals-pt.com
Comments to this Manuals