Miele G 1142 SC Operations Instructions Page 1
Browse online or download Operations Instructions for Dishwashers Miele G 1142 SC. Miele G 1142 SC Operating instructions User Manual
- Page / 64
- Table of contents
- BOOKMARKS
- Operating instructions 1
- Contents 2
- Guide to the appliance 5
- Correct application 7
- Safety with children 7
- Technical safety 8
- Installation 10
- Correct use 10
- Accessories 11
- Disposal of your old 11
- Caring for the environment 12
- To open the door 14
- To close the door 14
- Safety lock 14
- Water softener 15
- Filling the salt reservoir 18
- Salt indicator 19
- Rinse aid 20
- Adding rinse aid 20
- Rinse aid indicator 21
- Setting the rinse aid dosage 22
- Loading the dishwasher 23
- Operation 32
- Additional functions 37
- Cleaning and care 38
- Problem solving guide 42
- Maintenance 50
- Programme chart 52
- After sales service 56
- Optional accessories 57
- Electrical connection 58
- ! The inlet hose must not be 59
- Plumbing 60
- Technical data 61
- Alteration rights reserved/ 64
- G1142/1152/G2142/2152 / 2709 64
- M.-Nr. 07 502 070 / 01 64
Summary of Contents
Operating instructionsfor dishwashersTo avoid the risk of accidents ordamage to the appliance, it isessential to read these instructionsas well as the
Installation~The dishwasher must be installedand connected in compliance with theinstallation diagram supplied.~The dishwasher must be correctlyaligne
~Inadvertently filling the salt reservoirwith powder or liquid dishwasherdetergent will damage the watersoftener. Make sure you have pickedup the corr
Disposal of the packingmaterialThe transport and protective packinghas been selected from materials whichare environmentally friendly for disposaland
Energy saving washingThis dishwasher is exceptionallyeconomical in its use of water andelectricity. You can make the most ofyour appliance by followin
To open the door^ Press the release catch inside thedoor grip upwards and pull the dooropen.If the door is opened during operationall functions are au
Water softenerIn order to achieve good cleaningresults, the dishwasher needs tooperate with soft water. Hard waterresults in the build-up of calciumde
To programme the water hardnesslevelEach time a button is pressed, one ofthe indicator lights will flash and lightup in the control panel. However, on
Checking the programmed waterhardness level^Switch the dishwasher off with theOn/Off button K.^Press the Start/Stop button in andwhilst holding it in
Before using the appliance forthe first time you require:–Approx. 2 litres of water,–Approx. 2 kg dishwasher salt,–Domestic dishwasher detergent,–Rins
^Remove the lower basket andunscrew the salt reservoir cap.Water or saline solution will run outof the reservoir when the cap isremoved. It should the
Guide to the appliance . . . . . . . . . . . . . . . . . . . . . . . . . . . . . . . . . . . . . . . . . . . . . 5Appliance overview ...
Rinse aidRinse aid is necessary to ensure waterdoes not cling and leave marks oncrockery during the drying phase andhelps crockery dry faster after it
^Add rinse aid only until it is visible inthe opening.The rinse aid reservoir holds approx.110 ml.^ Close the flap firmly so that it clicksinto place.
Setting the rinse aid dosageYou can adjust the rinse aid dosage forbest results.The rinse aid dosage can be set fromapprox. 0-6 ml. It is set to areco
NoteRemove coarse food residues fromcrockery.There is no need to rinse items underrunning water.,Do not wash items soiled withash, sand, wax, lubricat
Items not suitable fordishwashers:–Wooden cutlery and crockery oritems with wooden parts: these maydiscolour and fade. The glue used inthese items is
Upper basket,For safety reasons, do notoperate the dishwasher without theupper and lower baskets in place.^ Use the upper basket for small,lightweight
Universal support (depending onmodel)This support is designed to hold tallglasses and glasses with stemssecurely.^ Lower the support and lean tallglas
Adjusting the upper basketIn order to gain more space for tallerpieces of crockery in the bottom orupper basket, the upper basket can beadjusted on th
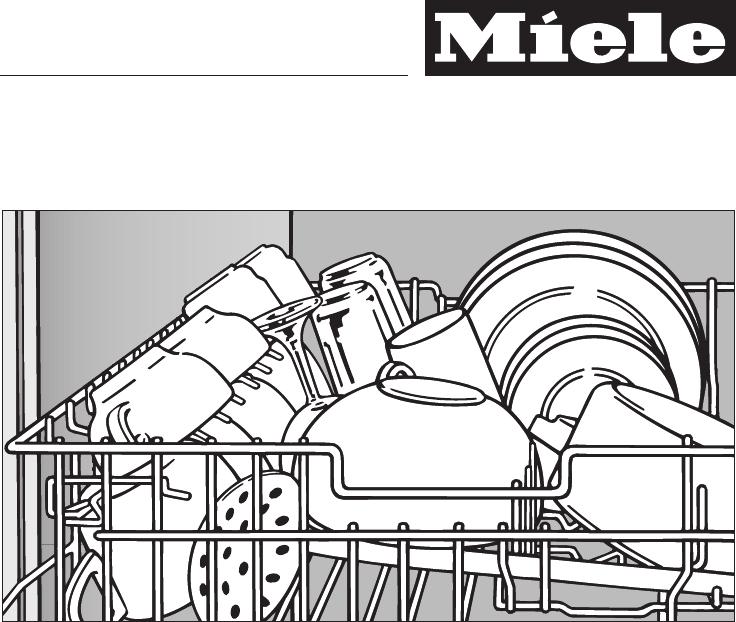
Lower basket^For larger and heavier items such asplates, serving platters, saucepans,bowls, etc.Small items such as saucers can alsobe placed in the l
Removable spiked insertYou can remove the spiked insert tomake more room for larger items ofcrockery, e.g. a large, flat pot, oranother type of insert
Operation . . . . . . . . . . . . . . . . . . . . . . . . . . . . . . . . . . . . . . . . . . . . . . . . . . . . . . . 32Detergent ...
CutleryCutlery tray (depending on model)^ Arrange the cutlery in the tray asshown.To make unloading much easier,cutlery should be grouped in zones,one
Cutlery basket (depending on model)^ To avoid the risk of injury, knives andforks should be placed with thehandles upwards in the basket.However, cutl
Detergent,Only use detergents formulatedfor domestic dishwashers. Do notuse washing-up liquid.Miele branded dishwasher cleaningproducts are available
,Avoid inhalation of powderdetergents and do not ingestdishwasher detergent. Dishwasherdetergents contain irritant or corrosiveingredients which can c
Switching on^Make sure the spray arms are notobstructed.^Close the door.^Open the stopcock, if it is closed.^Switch the dishwasher on with theOn/Off b
At the end of a programmeThe End indicator light will come on atthe end of the programme.The dishwasher can now be openedand unloaded (see "Unloa
Interrupting a programmeA programme is interrupted as soon asthe door is opened.If the door is closed again, theprogramme will continue from the point
Factory default settingIf you have altered any settings fromthe factory default, you can re-set themback to the factory default settings asfollows:^Sw
Check your dishwasher regularly(approx. every4-6months). Thisway faults and problems can beavoided.Miele branded cleaning andconditioning products are
Cleaning the filters in the washcabinetThe filter combination in the base of thewash cabinet retains coarse soil fromthe suds solution, preventing ita
Electrical connection. . . . . . . . . . . . . . . . . . . . . . . . . . . . . . . . . . . . . . . . . . . . . . 58Plumbing. . . . . . . . . . . . . .
To clean the inside of the filter, the flapmust be opened:^ Press catches a together in thedirection of the arrows as shown,and open the filter b.^ Ri
Cleaning the spray armsParticles of food can get stuck in thespray arm jets and bearings. The sprayarms should therefore be inspectedand cleaned regul
With the aid of the following guide, faults in the performance of the appliance,some of which may result from incorrect operation can be put right wit
Problem Possible cause RemedyThe Wash/Rinse,Drying and Endindicator lights flashsimultaneously.There may be a technicalfault.–Clean the water inlet fi
The dishwasher does not fill/drain.Problem Possible cause RemedyThe Inlet/Drain checkindicator flashes.The stopcock isclosed.Open the stopcock fully.T
General problemsProblem Possible cause RemedyDetergent residue is leftin the dispenser at theend of a programme.The dispenser was stilldamp when deter
NoisesProblem Possible cause RemedyKnocking noise in thewash cabinet.A spray arm is knockingagainst an item in abasket.Interrupt the programme,and rea
Unsatisfactory washing resultProblem Possible cause RemedyThe dishes are notclean.The dishes were not loadedcorrectly.See notes in "Loading thedi
Problem Possible cause RemedyDishes, cutleryand glasses arenot dry or areflecked.The amount of rinse aidmay be insufficient, or therinse aid reservoir
Problem Possible cause RemedyGlassware has abrown or blue tinge,and film cannot bewiped off.This may be caused by thedetergent.Change your detergent.G
Appliance overviewa Upper spray arm (not visible)b Cutlery tray (depending on model)c Upper basketd Middle spray arme Air inlet for drying(depending o
Cleaning the water inlet filterA filter is incorporated in the screwconnection of the valve on the waterinlet hose. The filter must be cleanedwhen dir
Cleaning the drain pump andnon-return valveIf the water has not been pumped awayat the end of a programme the drainpump or the non-return valve might
Crockery Food deposits Action requiredMixed,everyday crockeryAll normalfood depositsThis needs anadaptable programme...Heat-sensitive glassesand plast
Programme DetergentCompartment I2)Compartment II2)Sensor wash 55-65°25 ml–or1 tabQuick wash 40°C–25 mlor1 tab3)Light soiling 50°C25 ml–or1 tabEnergy s
Programme Programme sequencePre-wash Main wash°CInterim rinse Final rinse°CDrying12Sensor wash55-65°CVariable programme sequence,sensor controlled adj
Consumption1)Duration1)Energy WaterColdwaterconnection(15 °C)kWhHotwaterconnection(55 °C)kWhLitres Coldwaterconnection(15 °C)h:minHotwaterconnection(5
RepairsIn the event of any faults that youcannot remedy yourself, pleasecontact:–Your Miele dealer, or–the Miele Service Department (seeback cover for
To make the most of your dishwasherOptional accessories for particular purposes are available from your Miele dealer,the Spare Parts Department or onl
Electrical connection U.K.,All electrical work must becarried out by a suitably qualifiedand competent person, inaccordance with current local andnati
The Miele waterproof anti-leaksystemProviding your dishwasher has beeninstalled correctly, the Miele waterproofanti-leak system will protect you fromw
Control panela Programmesb Programme selector buttonc Start/Stop button with indicator lightd Check/Refill indicatorse Programme sequence indicatorsf
Drainage–The appliance drainage system isfitted with a non-return valve, whichprevents dirty water from flowingback into the dishwasher via thedrain h
Dishwasher model G 1XXX G 2XXXHeight freestanding 84.5 cm(adjustable +3.5 cm)-Height built-in 80.5 cm(adjustable + 6.5 cm)84.5 cm(adjustable + 6.5 cm)
Alteration rights reserved/G1142/1152/G2142/2152 / 2709M.-Nr. 07 502 070 / 01
This appliance conforms to currentsafety requirements. Inappropriateuse can, however, lead to personalinjury and damage to property.To avoid the risk
Technical safety~Before setting up the appliance,check it for any externally visibledamage. Under no circumstancesshould you use a damaged appliance.A
~This appliance may only be installedin mobile installations such as ships if arisk assessment of the installation hasbeen carried out by a suitably q
Related products and manuals for Dishwashers Miele G 1142 SC
 (76 pages)
 (24 pages)
 (48 pages)
© 2020, manymanuals.com. All rights reserved. | 1.621 s |
 Manymanuals.com
 Manymanuals.de
 Manymanuals.fr
 Manymanuals.it
 Manymanuals.pl
 Manymanuals.cz
 Manymanuals.es
 Manymanuals-pt.com
Comments to this Manuals